


Hey fellow craft lovers. As we enter into the glorious autumn season, it is also time for some of us to be properly thinking about the next season ahead and (dare I say it)... if you’ve not already started, do some Christmas crafting! Here is a little inspiration for you, using the newly released Tonic Showcase: Happy Holiday Set; which comes with a die & stamp set as well as a stencil. I have found it super fun and very versatile to play with.

To make this festive card, you will need the following:
- Showcase: Happy Holiday Christmas Tree Stamp & Die Set
- Santa’s Workshop Diamond Hybrid Ink Pads
- Nuvo Embellishment Mousse - Seaspray Green & Myrtle Green
- Nuvo Expanding Mousse - Worn Linen & Bramley Apple
- Craft Perfect Kraft Card
- Craft perfect 7x7” Bright White Card Blanks
- Craft Perfect Foam Pads
- Tonic Studios Magnetic Crafter’s Platform
- Nuvo Blending Daubers
- Nuvo Precision Blender Brushes
- Nuvo Media Spatula
- Washi tape
- Tonic Tangerine Die Cutting Machine
- Heat tool
- White gel pen
Step 1

Cut x2 7x7” squares from kraft card. On one of the squares, position the tree outline die slightly over towards the left-hand-side, secure into place with tape and cut to create a tree stencil (negative) and tree cutout (positive).
Step 2

Position the square with the tree stencil directly over the top of the second kraft square and secure into place. TIP: The Tonic magnetic crafter’s mat is ideal for this.
Step 3

Using a blending dauber, apply the ‘Shamrock Green’ Nuvo Hybrid Ink through the tree stencil. Let’s call this Tree 1.
Step 4

Remove the tree stencil, take the tree cut out piece and secure it directly over the top of Tree 1. Using the white pigment ink and a blending dauber, create a ‘misty’ effect around the tree edge.
Step 5

Remove the tree cut out and re-position as shown. Continue the misty effect around to create a second tree, blending into the first with the pigment ink.
Step 6

Take your stencil that comes with the Happy Holiday set and using some washi tape, cover the immediate gaps surrounding the tree; including the tree’s trunk.
Step 7

First, reposition the cut tree shape stencil back over the top of Tree 1 and then position & secure the stencil you have just adapted over the top.
Step 8

Using a spatula, apply the ‘Bramley Apple’ Nuvo Expanding Mousse through the stencil and then heat-set with a heat tool to fluff it up.
Step 9

With a white gel pen, add some ‘snow’ definition to the tree edges.
Step 10

Die cut a second ‘tree’ shape (Tree 2) and apply the ‘Myrtle Green’ Embellishment Mousse first, adding some depth with the ‘Seaspray Green’ afterwards. Set aside to dry.
Step 9
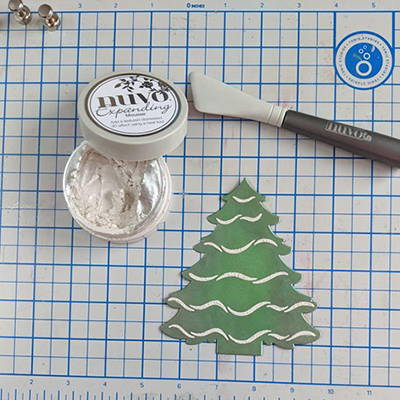
Remove the washi tape from the stencil and align the ‘snow waves’ over the top of Tree 2. Secure into place and apply ‘Worn Linen’ Expanding Mousse. Heat set and then do one final ‘long’ line along the bottom section of the tree.
Step 10

Using the stencil, add random ‘snow dots’ with the Worn Linen expanding mousse and heat-set each group of three, before applying the next three. Fill any gaps with single dots until you are happy with your ‘snowfall’ look.
Step 9

Trim the edges of your square base by approximately 3mm on each edge and attach to a 7x7” white card blank.
Step 10

Using foam fixers, attach Tree 2 directly over the top of the second ‘misty’ tree outline.
Step 9

Stamp the ‘Merry Christmas’ sentiment onto kraft cardstock in the ‘Glacier Cherry’ red hybrid ink and cut out using the above die shape. Using a white gel pen, hand draw a little border around the edges if desired.
Step 10

Attach the sentiment using foam pads and there you have your finished festive card!
I love getting messy and playing around with combining different Nuvo. I hope this has inspired you to have a play with bits you may already have in your crafty stash or to try something new.
Thank you so much for reading my post and happy crafting!
Kate x
Buy The Craft Project
