


Hello crafty friends,
Today I bring you a cute little Thank You card using this month’s new Tonic Craft Kit - Spring Meadow. As a crafter, I’m partial to a shaker card or two; so as this month’s kit contains a lovely large bottle of Nuvo Pure Sheen Confetti, I have included a little shaker window in the design.
As soon as I saw the new kit, I absolutely fell in love with the combination of yellows, creams and greens of the chosen colour-way and did somebody say ‘New Trend’?! ...Spring Meadow contains some sneaky peeks of new Nuvo and Craft Perfect products from the first trend launch of 2022 which will be coming soon…woohoo!
What you will need
- Tonic Craft Kit - Spring Meadow
- Craft Perfect US A2 card blank - Ivory White
- Craft Perfect A4 Classic Card - Cream
- Nuvo Deluxe Adhesive
- Glue Gun
- Craft Perfect Heavy Weight Construction Acetate
- Nuvo Clear Mark Embossing Pad
- Nuvo Clear Embossing Marker Pen
- Stamping Platform
- Heat tool
- Tangerine Die Cutting Machine
- Foam strips/tape
- Craft Perfect Double Sided Tissue Tape - 6mm
Step 1

Using a stamping platform, stamp out the arched stamp in Nuvo Clear Mark onto a piece of cream cardstock. (The card needs to be big enough to stamp a second time, to create an oval shape)
Step 2

Cover your stamped image in the embossing powder contained in the kit, tap off any excess powder and then heat set with a heat tool.
Step 3

Using a Nuvo clear marker pen, alternately colour in the ‘striped’ sections of the design as well as the ‘leaves’ in the corners. Apply the embossing powder and again tap off any excess and heat set.
Step 4

Using your stamping platform, perfectly align the stamp to create an oval shape.
Step 5

Repeat the previous processes of stamping in Clear Mark Embossing Ink, applying and heat setting the embossing powder and then colouring in and embossing the same elements of the design as before to create this symmetrical oval design.
Step 6

Using washi tape or low-tack tape, position the ‘oval’ and ‘rectangular’ shaped dies from the kit into position as shown and cut using your die cutting machine.
Step 7

Cut a small piece of acetate to size, measuring approximately 7 x 6cm
Step 8

Attach the acetate panel to the back of your oval shape using double sided tissue tape to create a shaker window
Step 9
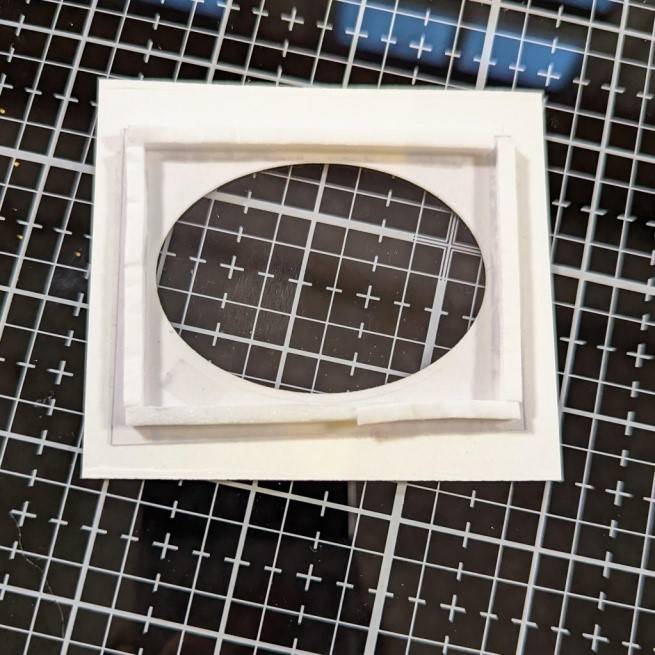

Using foam strips or foam tape trimmed down to a width of approximately 3mm wide, attach the tape to create a ‘well’ surrounding the oval shape. Add some of the Nuvo Pure Sheen Confetti, leaving enough space to be able to shake them around.
TOP TIP: I’ve not included a photo here, but confetti has a tendency to ‘stick’ to acetate and therefore make shaking it around difficult. To avoid this happening, I rubbed my acetate sheet with an ‘anti-static’ bag before adding the confetti. If you don’t have one of those, corn flour in a pop-sock works just as well!
Step 10

Cut a small piece of the ‘Water Sprite’ Craft Perfect card, big enough to cover the foam strips and contain the confetti. Attach into place.
Step 11

Cut a piece of ‘Water Sprite’ Mirrored Cardstock measuring 8.5cm x 7.5cm
Cut a piece (of the darker end) of the Ombre ‘Opalescent Green’ cardstock to measure 9.2cm x 8.2cm
Step 12

Attach the smaller mirrored card to the ombre glitter card and then adhere to the shaker panel to create a ‘double border’ effect.
Step 13

Cut a piece of the ‘cross-hatch’ patterned paper to measure 10cm x 13.2cm
Cut some ‘Water Sprite’ Mirrored cardstock to measure 10.4cm x 13.6cm
Step 14

Attach the patterned paper to the slightly larger mirrored cardstock to create a bordered edge.
Step 15

Cut a piece of the ribbon from the kit to measure approx 19cm in length. Attach some of the red line tape to the top and bottom edges of the ribbon.
Step 16
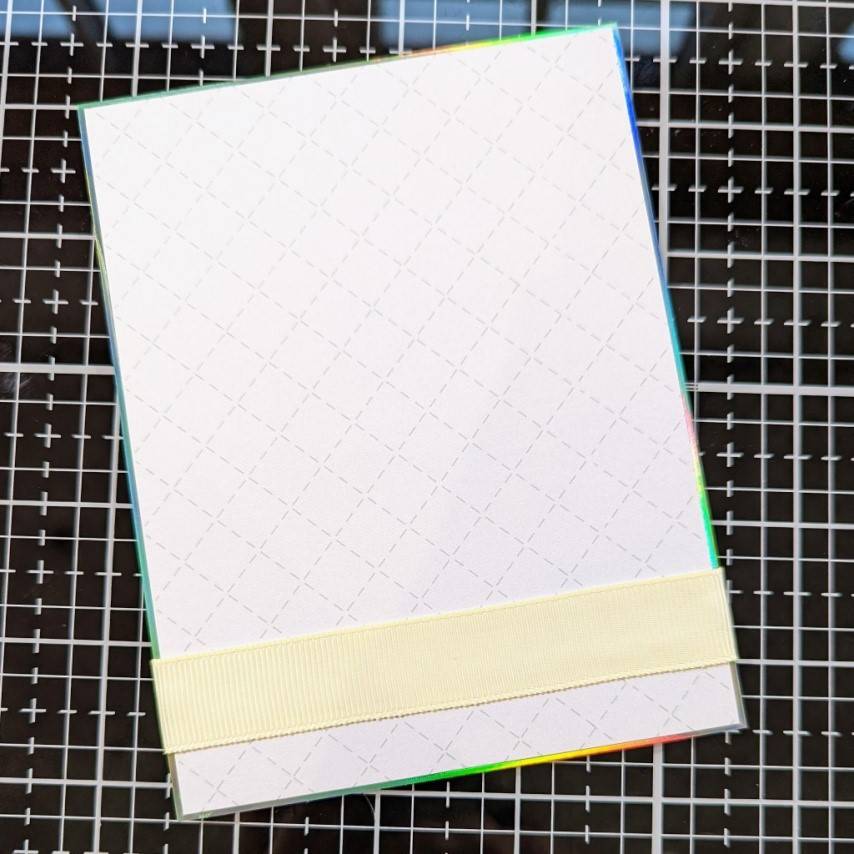
Wrap the ribbon approximately 13mm from the bottom of the panel and adhere using the red line tape.
Step 17

Make a small bow using the ribbon.
Step 18

Combine the ‘thank you’ and ‘oval’ dies to cut the sentiment out in the ‘Sherbert Lemon’ glitter cardstock.
Step 19

Glue the thank you sentiment to the oval acetate panel of the shaker window.
Step 20

Attach the panel with the ribbon strip to an A2 card blank.
Step 21

Attach the shaker panel, aligning the bottom edge to the top edge of the ribbon.
Step 22

Attach the bow as shown.
I find a hot glue gun works best for securing firmly into place.
Step 23

Attach four of the gems, one to each of the corners of the shaker panel, to finish.

And there you have a cute, elegant little thank you card; ideal to have on hand when you need to send a little note of thanks but with that added bit of interactive fun in being able to ‘shake it, shake it’!
A massive thank you for stopping by the blog today and reading my post. I hope this has got you inspired by this month's kit and has made you as excited to see the new up-coming Tonic Trend as me!
Take care and happy crafting,
Kate x
Buy The Craft Project
