 Gem Rewards

Questions Menu
What Is A Die?
A die is a piece of metal with a raised edge that will cut a shape out of a sheet of card with the aid of pressure. Dies come in various shapes and sizes and have a wide range of uses, such as shapes that can cut a butterfly, layers, words and letters or even cutting out an outline that can help you assemble a box. Dies are mainly used to cut card and paper but can cut out various materials like thin craft foam, metal and even some fabrics.
Dies have one smooth side, and the other side will have raised ridges. The ridges are used to cut your shape out.
What is die cutting?
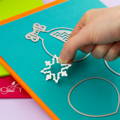
Die-cutting is basically like using a cookie-cutter, but instead of cutting into yummy baked goods, you use it to cut into paper using a die cutting machine, as, unlike cookie cutters, die-cutting cannot be done by hand. Instead, the machine applies pressure which allows the metal to cut through the cardstock.
Die sets allow you to have the perfect cut out shape every time. This is why die-cutting is so handy, especially in crafting! You're guaranteed the same shape with ease, and you can make a variety of beautiful cards that look professionally done or even a cute little gift box without the worry of your dimensions being incorrect.
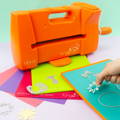
What is a die cutting machine?
To be able to die-cut, you need a die cutting machine. A die cutting machine helps apply pressure to the die and helps it cut out your chosen shape from your card. A die cutting machine usually uses a set of plates. You place your card and die with the raised edge face down into the card on the cutting plate, add the top plate and then this is fed through your machine, generally on a set of rollers. If you have a manual machine, you will need to feed the plates through using a turning handle. An electronic machine does the same job, but instead of using a handle, you press a button and it feeds the plates through the machine itself.
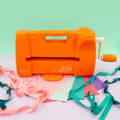
At Tonic Studios, we have our very own manual die cutting machine called the Tangerine, which you can find out more about below.
What is a die cutting sandwich?
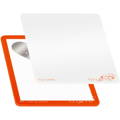
A “die-cutting sandwich” is how crafters refer to the combination of plates for your die-cutting machine. The sandwich comes from using two plates that are essentially your bread, and then you have your sandwich fillings, for example, a die and card. You can have different sandwiches for different dies, so check your machine’s manual to know which sandwich is right for you. Finding this information will typically fall under “plate combinations”. I have included our Tangerine machine plate combinations below as an example of what to look out for.
Die Cutting
White top plate
Die
Sharp edge facing down
(into the card)
Your choice of card
(for best results use 240gsm)
Orange die cutting plate
Tip
Some intricate dies may not cut in one pass. If necessary rotate your die and card 90° and cut again. Additionally, embossing your die cut shapes can aid stubborn cuts.
Embossing a Die
White top plate
Die
Sharp edge facing down
(into the card)
Your choice of card
(for best results use 240gsm)
Green embossing mat
Green die embossing plate
Embossing Folder
White top plate
Embossing folder with card inside
(for best results use 240gsm)
Raspberry embossing plate
Note: Embossing folders differ in design complexity and plate thickness. Sometimes experimentation is required but you should never force a stiff plate combination through your Tangerine! If your embossing folder combination is breaking your card consider using the green plate to replace the white top plate. If the embossed result is weak consider using the green plate and mat to replace the white top plate.
When feeding the sandwich into the machine, if you feel like you are forcing it or it is becoming too difficult to cut, try to reverse your sandwich out of the machine by turning the handle in the opposite direction to remove the plates. Never try to force your sandwich through as this can damage your die, plates or machine. If the sandwich doesn't fit or is being forced, and you are not sure why it's not going through smoothly, deconstruct your sandwich and check if there is anything between your plates that should not be there, remove anything unwanted and try again. If you are still having problems or there was nothing to withdraw, please check the machine's manual or contact the manufacturer's customer service.
What materials can I die cut?
Most die-cutting machines can cut out paper and card. However, depending on the machine's specifications (please read your machine's manual), they can also cut out other materials such as felt, foam, thin fabric, vellum, cardboard, vinyl, and cork! However, please check with your die set manufacturer first if their die sets can cut through the above materials.
What do you need to start die cutting?
The main essential item for die-cutting is a die cutting machine with the correct manufacturer's plates. Some machines might have their plates sold separately, so make sure to check if those are included in the description. Our Tangerine machine has the plates included but can also be sold separately. With your machine, you will need to select a die and your chosen material. Let's use card as our example as it's a great place to start. Most machines come with operating instructions. However, if they do not, the internet is always a great place to look or you can also message the manufacturer's Customer Service for any further information you may need. To get started, you will only need a die cutting machine, a die and some cardstock!
Does the size of my die matter?
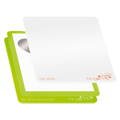
Yes, size does matter. If you have an A4 die cutting machine like the Tangerine, then the size of your die does not matter. Die sets are typically no bigger than A4 so will fit through an A4 die cutting machine. However, if you only have a smaller machine such as the Gemini Go then you are limited to what dies you can feed through. Most of our Dimensions range would not fit the smaller machines. However, die sets like our Rococo range will fit through the smaller die cutting machines.
What is an embossing folder?
Embossing folders are similar to die sets. However, instead of cutting the shape entirely out of your cardstock, it leaves an imprint on the card. When you emboss, you need to make sure you use the correct plate combinations as not all die-cutting machines give you this option. To use a folder, open it up, place your chosen card inside and then use the correct plate combination. In the diagram below, you can see the correct plate combination for our Tangerine machine.
White top plate
Embossing folder with card inside
(for best results use 240gsm)
Raspberry embossing plate
Note: Embossing folders differ in design complexity and plate thickness. Sometimes experimentation is required but you should never force a stiff plate combination through your Tangerine! If your embossing folder combination is breaking your card consider using the green plate to replace the white top plate. If the embossed result is weak consider using the green plate and mat to replace the white top plate.
How to die cut?
Jodie Johnson provides a beginners guide to die cutting below. Here she explains and demonstrates how to die-cut to help you grow your knowledge.

How to emboss using a die set?
Jodie Johnson provides a beginners guide to embossing. Here she explains and demonstrates how to emboss using a die to help you grow your knowledge further and feel confident when adding more detail and depth to your craft projects.
Top Tips for die cutting
- Die storage with magnetic sheets will become your next best friend, when you need to store your growing collection of die sets. Theses folders keep your craft room tidy and organized as well as minimizing the opportunities for you to misplace your dies.
- If you appear to be struggling to get a clean cut when feeding a die through your machine, try adding a metal shim to your sandwich for extra pressure.
- Keep your dies close to the edge of your plates as this is where you will get the most pressure. If the die is in the center of the plates, you may need to pass it through the machine a couple of times to get achieve enough pressure. This is particularly applicable to intricate dies.
- A pokey tool or craft pick will become super handy when trying to poke out all the excess paper left behind in the shape you have cut out. This tool really helps to keep the die cut intact while removing the pieces of card from all the tiny spaces.
- If you have excess card in your die set after cutting, you can either poke it out with your craft pick or give it a couple of little taps, making sure you're tapping the back of the die, to avoid damaging it.
- Intricate dies can sometimes be a bit more challenging to cut out all the detail in one go. A simple, easy fix is to run it through again, but the second time turn your plates 90 degrees.
- Use some washi tape to help keep your die in position on the plates. This will also help if you need to rotate your plates.
- Do not force your plate through the machine. If it feels forced, reverse your plates from the machine and check for foreign objects that should not be on or in between your plates. Give your rollers a clean as well in case there is anything lodged between them. If you are still experiencing issues, contact the manufacturer's Customer Service for help.
- If you start noticing apparent cracks in your plates, it might be time to replace them. This is normal after many uses, so don't worry if you do notice cracks. However, it's important to replace them and not use them through your machine as they could damage your machine.
- You can also use your die sets to create embossed shapes into your card, and you don't need an embossing folder to do this. This allows you to stretch your ideas further with your dies. I have included instructions below on how to emboss your die.
Embossing a Die
White top plate
Die
Sharp edge facing down
(into the card)
Your choice of card
(for best results use 240gsm)
Green embossing mat
Green die embossing plate
Helpful tools for die cutting
How to store your die sets

As your collection of die sets grows, you will likely need die storage to help organize and tidy up that craft room of yours. We use magnetic sheets to hold your dies in place, which help minimize you misplacing your dies, especially those tiny ones from your more detailed die sets. We have a variety of sizes to fit all crafters and occasions. Jodie Johnson also shows you in the video the best way to store your die sets.
If you want to know more about our die storage click the link below
If you have just started die cutting, and have plenty more crafty questions or want to show off your craft projects, you can tag us at @Tonicstudiosusa on Instagram or join our group on Facebook Tonic Studios Official Facebook Group.