![](https://ucarecdn.com/df593dce-6e73-4982-bf35-81b9a82e510a/-/format/auto/-/preview/3000x3000/-/quality/lighter/Blog-1000x1000-Ruth2.jpg)
![](https://ucarecdn.com/a8291dd2-a2e2-4fc2-9015-b21a09cd833b/-/format/auto/-/preview/3000x3000/-/quality/lighter/BLOG-TOP-BANNER-1800X450-Ruth2.jpg)
The delightful Dresser and Advent Accessory Gift Box Die Set is another of the fabulous launches for the Tonic Studios Birthday Week!
This is a very large die set with 51 dies and can be used to make a dresser with various types of decoration, an advent calendar and numerous other 3D boxes. You can also see how I made a different dresser and adapted the dies to make a 3 drawer box in my video here
Some of the beautiful lattice panels can also be used in card making.
What you will need
![](https://ucarecdn.com/813bba7a-ef85-4eb0-a5e6-0d5e00ce4e4e/-/format/auto/-/preview/3000x3000/-/quality/lighter/Picture3.jpg)
- Sturdy card for the base - I used Craft Perfect Bright White 300gsm Smooth Card
- Craft Tacky Glue (or hi tack tape)
- Patterned paper to decorate
- Small brad
- Ribbon
Step 1
![](https://ucarecdn.com/57a75491-c6a6-47e6-8003-4cf13810f502/-/format/auto/-/preview/3000x3000/-/quality/lighter/Picture4.jpg)
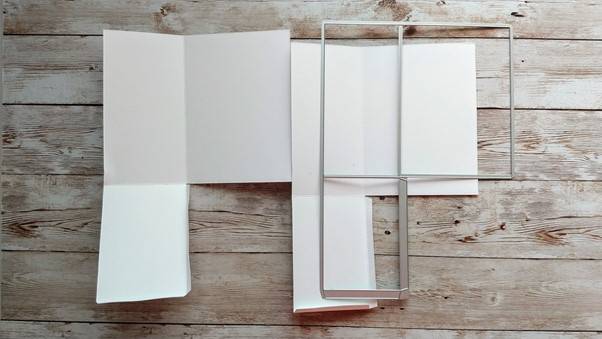
Cut out the main die twice and fold the score lines.
Step 2
![](https://ucarecdn.com/b2321d07-7670-4cdc-a2ae-75c6240e5bd2/-/format/auto/-/preview/3000x3000/-/quality/lighter/Picture5.jpg)
Glue the 2 bases together as shown.
Step 3
![](https://ucarecdn.com/537733b2-d4cb-4d74-9266-1d1dde66041c/-/format/auto/-/preview/3000x3000/-/quality/lighter/Picture6.jpg)
Die cut 12 of the shelf dies and 12 of the drawer dies.
Step 4
![](https://ucarecdn.com/11e99ddf-f97d-4ee2-8b76-3351f0eae4e1/-/format/auto/-/preview/3000x3000/-/quality/lighter/Picture7.jpg)
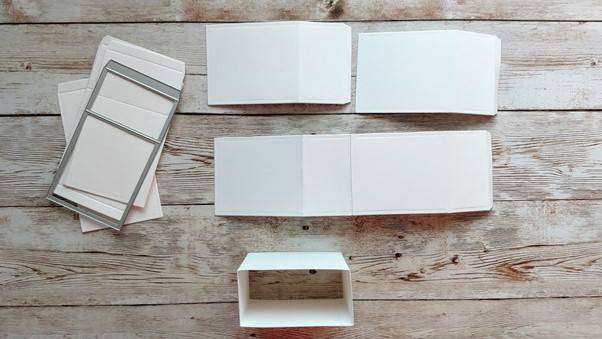
Glue the shelf die cuts together as shown in the steps above.
Step 5
![](https://ucarecdn.com/a82660bd-680a-406d-8cfd-6911ea10a86a/-/format/auto/-/preview/3000x3000/-/quality/lighter/Picture8.jpg)
Glue the 12 finished shelves into the dresser.
Step 6
![](https://ucarecdn.com/c5bab355-9ce8-4853-8454-c3becf5b9fcd/-/format/auto/-/preview/3000x3000/-/quality/lighter/Picture9.jpg)
Glue the drawer die cuts together as shown in the steps above.
Step 7
![](https://ucarecdn.com/f67ba9cd-29e6-4a4c-a6db-0951529d3fb6/-/format/auto/-/preview/3000x3000/-/quality/lighter/Picture10.jpg)
Glue the shelves into the dresser.
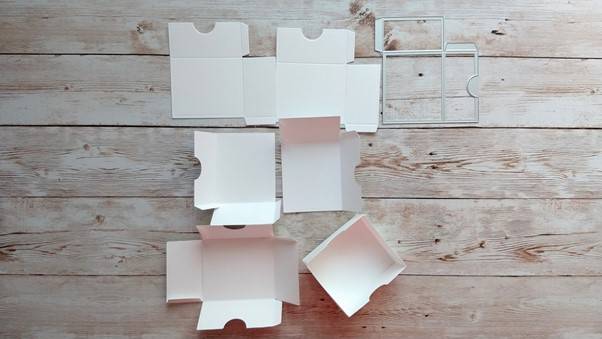
Step 8
![](https://ucarecdn.com/3491fdac-87f2-40ed-ab0b-fce2a30432f0/-/format/auto/-/preview/3000x3000/-/quality/lighter/Picture11.jpg)
Die cut 2 of the door dies.
Step 9
![](https://ucarecdn.com/d9039b9d-6126-4d60-9cbf-387fc6a0ce34/-/format/auto/-/preview/3000x3000/-/quality/lighter/Picture12.jpg)
Fold the score lines as shown above.
Step 10
![](https://ucarecdn.com/f805f66b-6287-4d11-b15d-cb510a73bf18/-/format/auto/-/preview/3000x3000/-/quality/lighter/Picture13.jpg)
Fold the sides in and glue as shown to make a 3D door frame.
Step 11
![](https://ucarecdn.com/5a95cf5f-6804-44f2-91de-a6fa602f26db/-/format/auto/-/preview/3000x3000/-/quality/lighter/Picture14.jpg)
Fold the last piece over and glue in place leaving the outside tab as the hinge.
Step 12
![](https://ucarecdn.com/b65943f9-abe1-4a0b-869b-532e80dae0d5/-/format/auto/-/preview/3000x3000/-/quality/lighter/Picture15.jpg)
Die cut the top pieces for the dresser and glue together as shown.
Step 13
![](https://ucarecdn.com/4b885a57-352b-4c0f-9871-5da28f54d694/-/format/auto/-/preview/3000x3000/-/quality/lighter/Picture16.jpg)
Glue onto the top of the dresser.
Step 14
![](https://ucarecdn.com/502beb85-49b1-4ae8-8cda-67feb909afe2/-/format/auto/-/preview/3000x3000/-/quality/lighter/Picture17.jpg)
Die cut 2 of each of the dies shown and fold on the score lines.
Step 15
![](https://ucarecdn.com/c9bd3676-fa81-4565-8bc0-778b9e13d8d8/-/format/auto/-/preview/3000x3000/-/quality/lighter/Picture18.jpg)
Glue together to form a base for the dresser.
Step 16
![](https://ucarecdn.com/fe156134-6f20-47a5-b1cb-7bed78793e9b/-/format/auto/-/preview/3000x3000/-/quality/lighter/Picture19.jpg)
Glue onto the bottom of the dresser.
NB. I have done all the basic dresser die cutting first and then cut the decorative panels, therefore I have left the sides of the base unglued until the patterned paper is added. You can decorate first if you like.
Step 17
![](https://ucarecdn.com/6d8f2a0c-673f-4781-9817-9d7674d7ef02/-/format/auto/-/preview/3000x3000/-/quality/lighter/Picture20.jpg)
Die cut 4 panels of patterned paper and glue 2 back to back. Glue to the insides of the door frames.
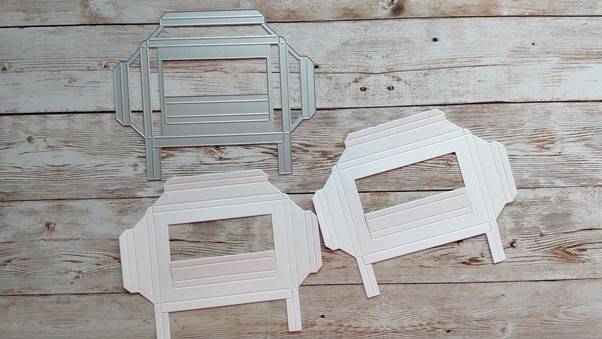
Step 18
![](https://ucarecdn.com/ed6063c4-6e43-4cb9-b2f1-a9d62545ec67/-/format/auto/-/preview/3000x3000/-/quality/lighter/Picture21.jpg)
Using the dies shown, cut out the decorative panels and glue in place.
Step 19
![](https://ucarecdn.com/9e2a7fe6-e16a-464c-b762-d4a796be7106/-/format/auto/-/preview/3000x3000/-/quality/lighter/Picture22.jpg)
Using the dies shown, cut out the decorative panels and glue in place. Glue a 12.5cm x 9cm panel of patterned paper onto the back of the dresser.
Step 20
![](https://ucarecdn.com/17e527bf-78da-40fb-98b3-233ec690a4da/-/format/auto/-/preview/3000x3000/-/quality/lighter/Picture23.jpg)
Cut out the dies shown on the right and glue onto the door and bottom of the dresser. Add ribbon to the handles.
Step 21
![](https://ucarecdn.com/8d749ad9-7cdb-47e2-a139-b3b271912d07/-/format/auto/-/preview/3000x3000/-/quality/lighter/Picture24.jpg)
Die cut 2 of the larger dies in white card and 1 of the smaller in patterned paper. Glue together and add the brad.
Step 22
![](https://ucarecdn.com/f64e1a81-c019-450b-ab25-7c22366824ec/-/format/auto/-/preview/3000x3000/-/quality/lighter/Picture25.jpg)
Attach the brad to the centre of the top of the dresser.
![](https://ucarecdn.com/d28cf5c0-38b7-4f79-a99a-ada5fa33e07f/-/format/auto/-/preview/3000x3000/-/quality/lighter/Picture1.jpg)
![](https://ucarecdn.com/8d86c23c-bc19-4ea4-b022-080cf5170dde/-/format/auto/-/preview/3000x3000/-/quality/lighter/Picture2.jpg)
Buy The Craft Project